Showing posts with label DIY. Show all posts

How to Paint a Striped Accent Wall

I've gotten a few requests for a tutorial on how to paint a perfectly striped accent wall since I posted our nursery wall last week.
I will say, this looks hard, but it's not hard. It's tedious, but it's not difficult, you just have to do things a little differently than when you just paint a room.

What you need for the stripes:
~A yard stick/longer ruler, preferably one with a level
~a laser level
~painter's tape
~pencil
(and paint obviously, in whatever color you want the stripes in)

We painted all of the walls of the room gray to start. I chose to do this because it required less taping, and I knew I would have fewer white stripes on the wall than gray (aka, less painting of the lines, and I wouldn't have to tape the ceiling or baseboards). 

To start the accent wall, I taped off the sides of the wall and ran over them with a credit card to ensure there weren't any bubbles for paint to run through. I did not tape along the ceiling or the baseboards because my top and bottom stripes were going to be gray and therefore already painted.

Then I measured the distance from the ceiling to the top of the baseboard (mine was 91") and divided that number by 7 (the number of stripes I wanted on the wall). Luckily for me, it came out to an even 13" per stripe.

Height of wall divided by number of stripes=width of each stripe

I started measuring from the ceiling down 13" and made a little mark on the wall, moved over a little more than a foot and did the same thing, until I'd made it across the length of the accent wall.

Then I took the laser level and shot it across the wall to make sure the dots lined up. This is most important during this step because ceilings aren't always level. I made a couple of adjustments to the dots and then drew a light line connecting the dots across the wall for my first line.
(you will need someone to hold the level, and someone to eyeball it, and make adjustments--this is a two person step)
the pencil lines are faint in this photo, but you get the idea
Having a ruler with a level built in helped me with this since I lined the top of the ruler up with the line I'd just drawn, then checked the level before making my dot 13" down from the top of the ruler. This way, I didn't really need the laser level again (although I checked every time, and it was always level).
I continued this process until I had all of my stripes outlined on the wall in pencil.

Now on to the taping. Remember which stripes you're going to paint and then tape above and below the lines you just drew. You can put an x in the stripes that you'll paint so you remember, if that helps. I continued to talk it through to myself so that I didn't mess up.
(example: the first white stripe, you will tape above the line for the top of the stripe, and tape below the line for the bottom of the stripe...and so on).
 When you're done, it will look like you have some smaller stripes and some larger stripes, but that's only because you've taped off the edges of the stripes you'll be painting.
Run a credit card over the stripes to again help get rid of any bubbles that might let paint leak through.
I've labeled where the white stripes will be to help give a visual for what I'm referring to:
Here comes the extra step. You now need to paint along the edges of each of the future white stripes with the gray color (or whatever your wall color is). This seems counter-intuitive since that's not the color the stripe will be, BUT it seals in the background color from any leaks that might come through the tape, so that when you eventually put white paint on, it's already sealed with the other stripe color. Make sense?
Future white stripes, outlined in gray paint
Let this dry well. Then you can start rolling the white paint into the same stripes that you just outlined. Ours took 3 coats since the background wall color was darker, but we were able to do it with 1 pint of white paint.
after one coat of paint
Make sure that when you do your last coat of paint, you're taking the tape off when the paint is still wet otherwise the tape will pull the paint off of the walls. Pull in a downward motion to have the angle help "cut" the tape from the wall.

And voila! A perfectly straight, clean striped accent wall!
Hopefully this helps to explain the process a bit more. It took me a while to figure it out (and several attempts at talking it out to both myself and MG before each step to ensure I didn't mess something up), but I think the visuals here will help.
If you have any questions or anything is confusing, feel free to reach out and ask!

How To Easily Hang a Gallery Wall

If you're like me (and what seems like every person on Pinterest), you love a good gallery wall.
It's a great way to display a ton of pictures and create a focal point for a room.
And if you're also like me, hanging pictures in general can be a pain in the butt. I've marked a wall with a pencil for where I want my picture to go, and then when I go to hang it, it's not quite where I thought I'd like it, so I end up putting another hole in the wall.
This gets astronomically more difficult when you're doing a gallery wall.

Through all of my Pinterest searching, along with using a few of my own brain cells, I've figured out a way to do it so that it's pretty much error-proof, and really easy.

You'll need the following: 
newspaper, scissors, a pen, the nail you're using to hang your pictures,
and a hammer. 
Duh.


Step 1. Lay out the pictures somewhere, so that you can get an idea of what you want the layout to look like, where each frame/picture should go, etc. I did mine on the floor. (You can even take a picture of it to jog your memory when you go to put it on the wall).

Step 2. Cut out outlines of the pictures/frames that you want to use.
Most online tutorials say to use butcher paper, but most people don't have that laying around the house (at least, I didn't!) What most people do have, though, is newspaper!
I outlined mine in pen and then cut out with scissors.

Step 3. (and this is the genius part if I do say so myself)
Line the newspaper up with the back of the frame. By touch, find the spot where the nail hanger/hook is. Use a nail and poke through the newspaper at this spot. Now you know where to put your nail once you've hung it on the wall!
NOTE: when you put the newspaper on the wall, the side that you were looking at (when finding the hole) will be the side that faces the wall--otherwise your nails might not align if your hanger isn't dead center to your frame. 

Step 4. Hang the newspaper outlines on the wall (remembering to put the newspaper on the wall the correct way). 

Notice how this is the other side of the newspaper. NOT the side that I was looking at when I poked the hole through the newspaper.
Tape the edges to the wall, then take a step back and check that you like the layout. If you don't like it, now is the time to move it around.
I like this because it gives you the opportunity to get a perspective without having to ask someone else or  juggle a million frames at once.

Step 5. With the newspaper outlines still taped on the wall, hammer the nails into the wall in the little hole that you poked through the newspaper earlier.

Step 6. Pull the newspapers down off of the wall and hang your photos/frames on the nails left behind.

Voila! You have a beautiful gallery wall, with only the holes in the wall that you needed to hang everything--no extras!

I've since started doing this to hang single frames or multiple--it makes it SO much easier to line things up, or get juuuuust the right placement before putting that nail into the wall.

Happy hanging!!

Entry Hall Mirror Re-Do

I still haven't gotten myself together and downloaded all of the pics from the last week, but what I DID do, is finish my DIY of repainting a mirror for our entry hallway.

MG's mom gave us this mirror from her house that she wasn't using anymore when we moved.
It's a great looking mirror, but gold isn't really in any of the color schemes of our stuff, so I thought I'd repaint it.
Originally I wanted to do either silver or teal and decided on teal.

Here's what I did:
I went to Home Depot and picked out the paint color I had envisioned (I wish I could have done a sample size since that's about all the paint I needed, but those don't come in semi-gloss) which turned out to be Behr's Ultra paint in Sweet Rhapsody.
The paint guy there suggested that I do a satin finish since I didn't want it to be TOO shiny. It turned out great.

Next I used some sandpaper and roughed up the mirror some so that the paint would adhere a little better (especially since the original paint was kind of glossy as well). You can kinda see it along the outer rim in the picture below.
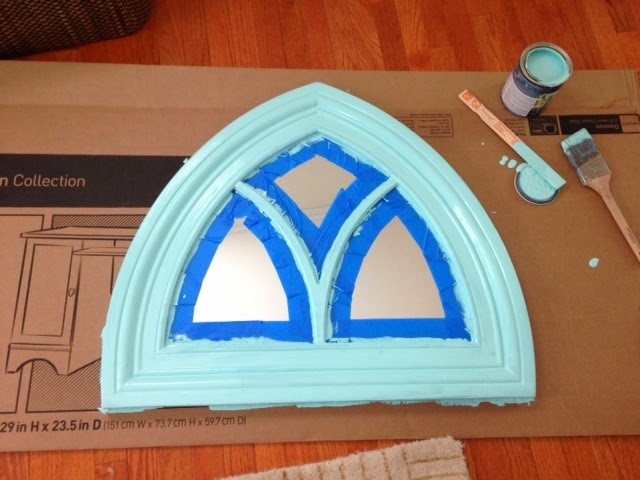
Then I taped up the mirror parts as best as I could, which was challenging given the shapes of the inside frames:

I set up a painting station in the living room and started painting everything with a paintbrush. 
There WILL be brush strokes in this first coat. If you're going for a weathered look, you can stop here. If you're not, use a smaller roller brush made for cabinets on your next coat, once the first coat has dried. 

The other two tiny paintbrushes I used when I took the tape off from around the mirrors. I picked up a 5 pack at Target for about $2.50 because I needed a small brush to get in around the edges of the mirrors to touch up the parts that the tape took off when it came off.

 Once everything dried, I had a brand new mirror!
(and a dog who was curious about what was going on :)
The lighting it a little darker in the last picture...the original picture is more true to the color.

I still need to hang it (aka, MG needs to hang it)--my plan being over the table in our hallway entry:

If you need/want a reminder of the general look I'm going for, take a peek at my pin-spiration: here

We still need some color on the walls, but, one project at a time! :)
Think it turned out ok and will look good all together?